 Project 3
Project 3: Scenes within Scenes
The goal of this project is to incorporate loops and conditionals into your code as well as provide more practice in encapsulating code and concepts for later re-use and manipulation.
Tasks
-
Create a new file called better_shapelib.py. Copy the goto
and block functions from your Project2/shapelib.py file into
better_shapelib.py. Add a parameter called
fill to the block function.
First, re-write the block function to take advantage of looping, if you have not already done so.
Second, edit the block function so that if the fill variable has the value True, then the block should be filled. If the fill variable has the value False, then the block should not be filled. You can use an if-statement before and after the drawing commands for your block to control whether to call the turtle's fill function.
You may also want to add an optional color argument to your block function. You can specify colors for the turtle using one of two methods: as a string, or as an rgb-tuple.
The strings you can use to specify colors are given here.
An rgb-tuple is simply three values in the range [0.0, 1.0] as a comma-separated list surrounded by parentheses. For example:
(0.15, 0.6, 0.2)
makes a nice artificial grass green. You can use an rgb-tuple or a string when calling the turtle.color function. The following two calls create identical colors.
turtle.color("Forest Green")
turtle.color( (0.13, 0.55, 0.13) )Don't forget to appropriately comment your functions. In each function's doc string, state what shape it draws, and where and how big it will be (e.g. if the scale is 1, then this function will draw a house with its upper left corner at (x,y) and will be 200 pixels high and 150 pixels wide).
- For at least 2 more of your basic shape functions from Project 2, copy them to your better_shapelib.py file, edit them to use loops wherever it makes sense and give them a fill parameter that controls whether the shape is filled (possibly partly filled) or not. As with the block function, you may also want to add a color argument.
-
For at least 2 of your aggregate shapes from Project 2, copy them to
your better_shapelib.py file, rewrite them using the new functions
with the fill parameter, and take advantage of looping wherever
possible. The goal is to make your code as efficient as possible in
terms of the number of lines of code and the simplicity of that code.
If you wish, use conditional statements to enable variations on the complex shapes. For example, you can make any function call dependent upon a random number using the following type of test. In the example below, the block will be drawn 70% of the time.
if random.random() < 0.7: block( x, y, w, h, True ) -
Pick one of your scenes from Project 2 (or create a brand new scene,
if you wish). Copy it to your better_shapelib.py file and re-write it
so the entire scene is parameterized by an x, y location and a scale
parameter. In other words, you should be able to have your scene draw
anywhere on the screen at any size.
If you have a scene that looks like the following:
def myscene():
  block(5, 10, 50, 100)
  triangle( 5, 100, 50 )
  goto( 30, 30 )
  turtle.forward( 10 )
  turtle.left( 90 )
  turtle.circle( 20 )
You can easily convert it to a scalable, moveable scene using the following rules. First, change the function to have parameters x, y, and scale.
-
For calls to a function that takes (x, y, size) or (x, y, width,
height):
block( a, b, c, d ) becomes block( x+a*scale, y+b*scale, c*scale, d*scale )
-
For calls to a goto function:
goto( a, b ) becomes goto( x + a*scale, y + b*scale )
-
For calls to the turtle forward or circle functions:
turtle.forward( a ) becomes turtle.forward( a * scale )
Angles do not change. Following the above rules, the myscene function would be the following.
def myscene(x, y, scale):
  block(x + 5*scale, y + 10*scale, 50*scale, 100*scale)
  triangle( x + 5*scale, y + 100*scale, 50*scale )
  goto( x + 30*scale, y + 30*scale )
  turtle.forward( 10*scale )
  turtle.left( 90 )
  turtle.circle( 20*scale )
-
For calls to a function that takes (x, y, size) or (x, y, width,
height):
-
Create a task1.py file that imports better_shapelib.py and uses the
scene function to draw several versions of the scene. Note that you
can assign a menmonic to any package you import. For example, the
following imports better_shapelib, but assigns the module the name bsl
instead of better_shapelib.
import better_shapelib.py as bsl
That means you can type bsl.myshape(x, y, scale) instead of better_shapelib.myshape(x, y, scale).
The first required picture is an image with three differently sized and positioned versions of your first scene.
-
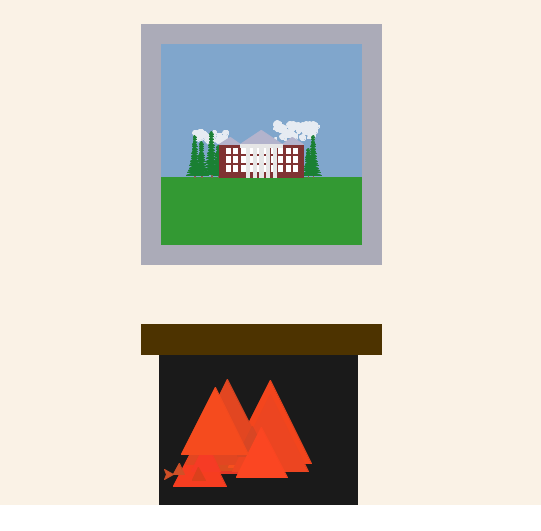
Create a task2.py file that creates a museum scene. The new scene
should incorporate your first scene at least once. For example, you
could make your scene appear as a window or painting within the new
scene. Make sure the new museum scene is also created inside a
function.
The second required picture is an image with your first scene located at least once inside a second scene.
-
Edit one of your two scenes so that some aspect of the scene depends
on a new parameter. It does not have to be fancy. Set up your program
so that the value of the parameter comes from a command-line argument.
Create two images showing how the command line argument affects the
appearance of your scene. For example, the command-line argument
might determine whether a particular object is red or blue.
The third and fourth required images should be examples of one of your scenes drawn using two different values for the command-line parameter.
Extensions
Each assignment will have a set of suggested extensions. The required tasks constitute about 85% of the assignment, and if you do only the required tasks and do them well you will earn a B+. To earn a higher grade, you need to undertake one or more extensions, which give you the opportunity to tailor the assignment to your own interests.
How well you complete the main assignment, combined with the difficulty and quality of any extension or extensions you complete will determine your final grade for the assignment. One complex extension, done well, or 2-3 simple extensions are typical.
- Put both of your last scenes from last week (or new ones you created this week) into the museum scene.
- Make use of the range function in creative ways, using 2 or 3 arguments.
- Demonstrate several levels of encapsulation (scenes within scenes within scenes).
- Make complex scenes without using complex code.
- Have the command line arguments control a number of different aspects of the scene. For this one, you must be sure that you use sys.argv in your main program only. If you have a function in better_shapelib.py access the command line parameters then you are dramatically restricting which main programs can use that function.
Writeup and Hand-in
Turn in your code by putting it into your private handin directory on the Courses server. All files should be organized in a folder titled project3. Include only those files necessary to run the program. We will grade all files and only the files in the Project2 directory, so please do not turn in old, non-working, versions of your code.
Make a new wiki page for your assignment. Put the label cs151f16project3 in the label field on the bottom of the page. But give the page a meaningful title (e.g. Stephanie's project 3).
In general, your intended audience for your write-up is your peers not in the class. Your goal should be to be able to use it to explain to friends what you accomplished in this project and to give them a sense of how you did it. Follow the outline below.
- A brief summary of the task, in your own words. This should be no more than a few sentences. Give the reader context and identify the key purpose of the assignment.
- A description of your solution to the tasks, including any images you created. This should be a description of the form and functionality of your final code. You may want to incorporate code snippets in your description to point out relevant features. Note any unique computational solutions you developed. Code snippets should be small segments of code--usually less than a whole function--that demonstrate a particular concept. If you find yourself including more than 5-10 lines of code, it's probably not a snippet.
- A description of any extensions you undertook, including images demonstrating those extensions. If you added any modules, functions, or other design components, note their structure and the algorithms you used.
- A brief description (1-3 sentences) of what you learned. Think about the answer to this question in terms of the stated purpose of the project. What are some specific things you had to learn or discover in order to complete the project?
- A list of people you worked with, including TAs, and professors. Include in that list anyone whose code you may have seen, such as those of friends who have taken the course in a previous semester.
- Don't forget to label your writeup so that it is easy for others to find. For this lab, use cs151f16project3