Lab 1: Getting setup for projects
The purpose of this lab time is to give you an introduction to the basic tools we will be using this semester. These tools include a terminal, a text editor, and the Python interpreter.
- Lab 1: Getting setup for projects
Weekly CS151 workflow
Labs. During each week's lab, you will get hands-on practice with concepts from lecture. Labs are also the starting point for the weekly project.
Projects. In the projects, you will get deeper experience working with concepts from lecture by writing Python code and running it to create outputs that you design, such as images.
Project report. You create a Google Doc with images from your project, along with a description of how you created them and what you learned. Labs and projects are tightly coupled.
Submission. Each week, you will see the current project posted on Moodle, along with the due date. To turn in your project, click on the post and attach:
- Code from lab and the project (all combined in one .zip file).
- Your Google doc project report.
- A copy of the grading rubric.
The goal of today's lab is to give you to practice completing each of these steps.
Tasks
L0. Getting your computer set up
If you have not already done so, get your computer ready for CS151.
L0a. Install Zoom, Python 3, Sublime
You will need to install several pieces of free software on your computer for this course. The following links provide step-by-step instructions for how to get each item working and setup, whether you have a Mac or a Windows PC.
- Install Zoom on your personal Mac or PC so that I can see help you through the screen sharing feature.
- Install Python 3 on your personal Mac or PC to run code.
- Install the Sublime text Code editor on your personal Mac or PC to write code. The editor is called Sublime for short.
L0b. Show file extensions
To make sure that you can visually recognize code files, make sure that you can see file extensions (like .docx for MS Word files) on your computer.
L1. Introduction to the Terminal
L1a. Open up the Terminal
Open up the Sublime text editor.
Open up the Terminal: Click on Finderand search for Terminal (Windows: click on start menu and type cmd).
L1b. What is the Terminal?
The Terminal a text-based, keyboard-only interface of using your computer. This is an alternative way to use your computer compared to the graphical interface that you're used to where you click on things like icons, folders, buttons, etc. Voice assistants like Siri and Google Assistant are alternative interfaces to your phone. Anything you can do in the Finder, you can do in Terminal.
Why learn Terminal?
- It doesn't go away! Many tools have worked the same way for 30+ years! Learn it now and it will be useful for many years to come.
- Automate lots of stuff. Need to rename 1000 files? You can do it with one command! Try doing that by clicking around!
- Most importantly for us: Terminal allows you to run your code.
L1c. Directories and paths
Just like the Finder (Mac) or Windows Explorer (Windows), with Terminal you are always "in" a particular folder (directory) of your computer. The current directory is called your working directory. A terminal will usually start in the your home directory. On my Mac, this is:
/Users/nsalmadi
If you are on Windows, it will look something like:
C:\Users\nsalmadi
As you can see above, directories are separated by a slash. On Macs this is the forward slash /, on Windows this is a backward slash \. They have the same meaning, but you cannot substitute one for the other if you are on a Mac!
Windows users: The following instructions are written with the forward slash convention, but on Windows forward and backward slashes are interchangeable, so you can still follow along exactly as things are written.
My home directory /Users/nsalmadi is an example of a path, which is a complete description of where a directory or file on my computer. Paths usually are case-sensitive, so be sure to use proper capitalization (i.e. /Users/nsalmadi has a different meaning than /users/nsalmadi). You will use paths, and filenames to change directories, list the contents of directories, and run Python programs.
L1d. Useful terminal commands
Here are some important commands that you type into the Terminal to know for this class. You hit the Return key to actually run the command.
pwd: Stands for "print working directory". It tells you where you currently are on your computer. Try this!cd <type in a directory here>: Stands for "change directory". You type the command, followed by a space, followed by the directory or path you want to go to. Want to just move up one folder from where you are?cd ... Move up 2 folders?cd ../... etc. Here are some examples of common usage:
| Command | Meaning |
|---|---|
| cd ~ | Set the current directory to your home directory. (The ~ character is shorthand for your home directory.) |
| cd .. | Move up to the parent directory of the current working directory |
| cd ../../ | Move up to the parent of the parent of the current working directory. |
| cd blah | Move into the sub-directory blah |
| cd /Users/nsalmadi/Desktop | Move to the Desktop directory give by the absolute path (starts with /). |
mkdir <folder name>: Stands for "make directory". Makes a new folder with a name of your choice in the current directory. Example:mkdir Lab1creates a new folder called Lab1 where ever you are.ls: Stands for "list" the files/folders in the current directory. (dirin Windows)Try it!
L1e. Terminal tips and tricks
Tab completion: Big, big time saver. When you start typing the name of a file or folder, press the Tab key. It will finish the typing for you! After it finishes, you can keep typing a little more, then hit Tab again to have it complete more. Example: Typing cd /Us then Tab results in: cd /Users/. If I then type "n" then Tab, it gives me cd /Users/nsalmadi/.
- If you have two or more files that start with b, tab completion will beep at you. If you press tab again, then the terminal will show you the options (all the files that start with b). If the files that start with b are
byeandbayand type "a" so your command looks likecd ba, it will autocomplete tobay. - You can use Tab completion with files/folders in the current directory too. If you have folders in your current directory called
ProjectandLab, typingcd Pthen Tab will give youcd Project/.
Hitting return: You don't have to be at the end of the line to press return. If you go back and edit something in a terminal command, you can press return and execute the whole line no matter where the cursor is located.
Drag folder icon into Terminal (Mac): The best tip. Often you have your project/lab folder in Finder and want to run the code in it. You need Terminal to "look at" the same folder to do this. Since opening usually Terminal starts you in your home folder (e.g. /Users/nsalmadi for me), it can be a chore to cd your way to the project folder. There is an easier way. Type cd, space, then drag the blue folder icon at the top of Finder (next to your project folder name; see screenshot below) into the Terminal window. The correct path will magically appear and you can hit Return to move Terminal there!

Drag folder into Terminal (Windows): The best tip. Often you have your project/lab folder in Finder and want to run the code in it. You need Terminal to "look at" the same folder to do this. Since opening usually Terminal starts you in your home folder (e.g. C:\Users\nsalmadi for me), it can be a chore to cd your way to the project folder. There is an easier way. Type cd, space, drag the folder into the terminal from Windows Explorer. The correct path will magically appear and you can hit Return to move Terminal there!
L1f. Practice the drag folder icon trick
Mac users: In Finder, go to your Desktop and create a folder called Project01. Open it. Use the drag folder icon trick to navigate your Terminal to the Project01 folder. You know you got this working if the pwd command gives you /Users/<your user name>/Desktop/Project01.
Windows users: In Windows Explorer, go to your Desktop and create a folder called Project01. Use the drag folder trick to navigate your Terminal to the Project01 folder. You know you got this working if the pwd command gives you C:\Users\<your user name>\Desktop\Project01.
L1g. Make a lab folder on your desktop and navigate to it
Call it Lab01. Change directories to it so it is the current folder in the Terminal.
You know you got this working if you typing and entering the pwd command gives you /Users/<your user name>/Desktop/Lab01 (Windows users: C:\Users\<your user name>\Desktop\Lab01).
L2. Create and run your first Python program
Text editors are the workhorse programs for writing code. You don't want fancy fonts or WYSIWYG layouts, you just want to see lines of text, preferably with syntax highlighting, which means that special words in a language are highlighted to make it easer to read the code. There are many editors to choose from.
Do not write code in Microsoft Word or Google Docs!
In lecture and lab, we will use the Sublime Code editor Let's use Sublime to write our first Python program.
- Open Sublime.
- Create a new file (Cmd+N). Save it (Cmd+S) as
smart.pyin yourLab01directory on your Desktop. The .py is important — it tells your computer that this will be a Python code file (Windows users: Substitute Cmd for the Control key). - Write the text
print('You are smart')in the file. - Save the file (Cmd+S)
- In Terminal, change the working directory to your
Lab01folder on your desktop. You might already be there from Task L1g (runpwdto verify this). Otherwise use thecdcommand to get there (Use the drag folder icon trick!). - Instruct Python to execute (run) the program. In Terminal, type
python3 smart.py(orpy smart.pyon Windows)
Congratulations, you just ran your first Python program! (Python Humor)
Windows users: Whenever you see python3 blah.py type instead py blah.py.
Note: The above command works only if the current working directory is the one that contains the file smart.py. Remember that you changed the working directory to Lab01 on your Desktop in Task L1g. So, one thing you need to do when working on a project is to ensure that your Terminal is in the right directory. Think of it as making sure Sublime and Terminal need to agree where they are "looking" to find your code. You can always use ls to see the contents of the current directory and/or pwd to check what the current directory is.
L3. Introduction to Python turtle
Python is a simple yet powerful language for making computers do stuff. Many people have written modules for Python that do some sophisticated things. One of those modules is called turtle.
Think of turtle as a virtual turtle that drags along a pen and draws as you command it to move on a virtual sheet of paper.
We can make the turtle move forward, backward, turn left, turn right, and pick up or put down the pen using the following commands.
forward(x)- move forward x pixelsbackward(x)- move backward x pixelsleft(a)- turn leftadegreesright(a)- turn rightadegreesup()- pick up the pen (don't draw when the turtle moves)down()- put the pen down (draw when the turtle moves)
You can find out about more turtle commands on the Python documentation site.
L3a. Writing your first turtle program: drawing a hexagon
- Create a new code file from within Sublime (Cmd+N).
- Import the turtle module. On the first line of your code file, put the instruction:
from turtle import *
That will import all of the turtle commands (i.e. it will give you the ability get the turtle to draw for you.) - On the last line, write:
exitonclick()
This will keep the turtle window open until you click on the turtle window that pops up. - Save your file (Cmd+S). Name it
simple_turtle.py. Remember to include the .py file extension. Save it to yourLab01folder. - Have the turtle draw a hexagon using the
rightandforwardturtle functions commands. Place only one command per line, in between theimportandexitonclickcommands. - Test out your hexagon drawing program:
python3 simple_turtle.py
I don't want to ruin the fun of figuring out how to draw a hexagon, so let me give you an example of how to draw a sideways L-shape: The first of the following commands will move your turtle forward 100 units (rightward because the always turtle faces east initially), the second command makes the turtle face south (turn right 90 deg), then have your turtle move 50 units in that new direction (downward).
from turtle import *

forward(100)
right(90)
forward(50)

exitonclick()
Run your code and make sure that your turtle draws a hexagon before moving on.
L3b. Why is exitonclick the last command?
In simple_turtle.py, temporarily remove the last line exitonclick(). What happens?
After you see what it does (by removing it), add it back in.
L4. Moodle and written project reports
For each project, you will write a brief report in Google Docs and submit it on Moodle.
Each report consists of:
- A useful title, like "Naser's CS151 Project 1: What is a shape" so that the page content is clear from the title.
- Abstract: A one paragraph summary of the project.
- Results: Images showing what you created, alongside a description of what each image is and how you designed/created it with code.
- Reflection: A brief description (1-3 sentences) of what you learned.
- Sources: A list of people you worked with, including TAs, and professors.
All this will become second nature in a few weeks and is summarized in each project rubric on Moodle. Let's turn in a "mock" lab report featuring only a screenshot of your hexagon to help get the hang of it. For today, there is no need to write an abstract, reflections, sources, or results description — just a title and a screenshot.
L4a. Take a screenshot of your turtle creation
Take a screenshot of your hexagon.
Mac users
You can easily take a screenshot of your turtle creations to include in your reports by pressing Shift-Command-4. When you press those keys on your keyboard, a crosshair will pop up. Click and drag to draw a box around your hexagon. When you let go, a screenshot of the region that you selected gets saved to your Desktop.
Windows users
Follow the "Mouse and keyboard" directions to use the Windows Snip Tool to take screenshots. You want to use the Rectangular or Window option. With the Rectangular option, you click and drag a box (while holding down the click) around your hexagon when the screen dims. Let go when you are satisfied. Once you see your screenshot preview in Snip Tool, save it to your Desktop (File -> Save As).
L4b. Create a Lab 1 report
- Log onto Moodle, then navigate to our CS151 class webpage.
- Under each week, you will see a rubric. Click to open it. This is what the Project 1 rubric will look like and this is how we will grade it. Take a look through it, but you should not change anything. The ungraded rubric will get turned in along with your report when you are ready to submit your project. When your project is graded, the rubric will be returned to you, show you your score, and have comments about your project.
- We recommend using Google Docs to develop your report. Give your report a meaningful title like "Naser's CS151 Project 1: What is a shape" so that the page content is clear from the title.
- In all of you project reports, you will need to include pictures of the images you created with your program. Drag in your screenshot of your hexagon from your desktop into the Google Doc. Resize/crop/format the image as necessary in your report.
- Always create a caption under your images describing what it is and how it was made. Underneath your hexagon image, write "I created a hexagon change with Python using the turtle forward and right commands!"
- Notice the Turn In button on the top-right corner of the Google Doc. Don't click this button, otherwise you will turn in your project to be graded!
L5. Submitting a project
Here's a checklist of everything you should do when you are finished with a project and are ready to turn it in. Go ahead and follow these steps to turn in your code from today.
- In Finder, move your lab folder inside your project folder. For example, if you have
Lab01andProject01folders both on your Desktop, drag theLab01folder insideProject01. - Create a zip file of your project.
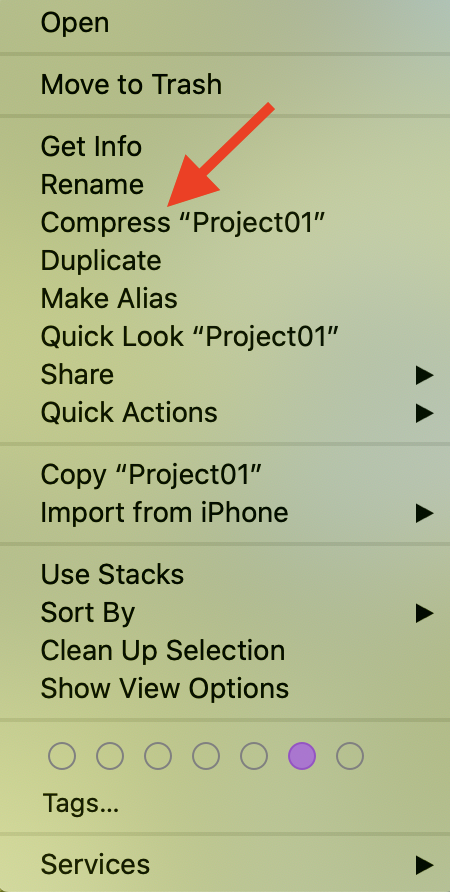
- On macOS, right-click the project folder (e.g.
Project01) and clickCompress "Project01".
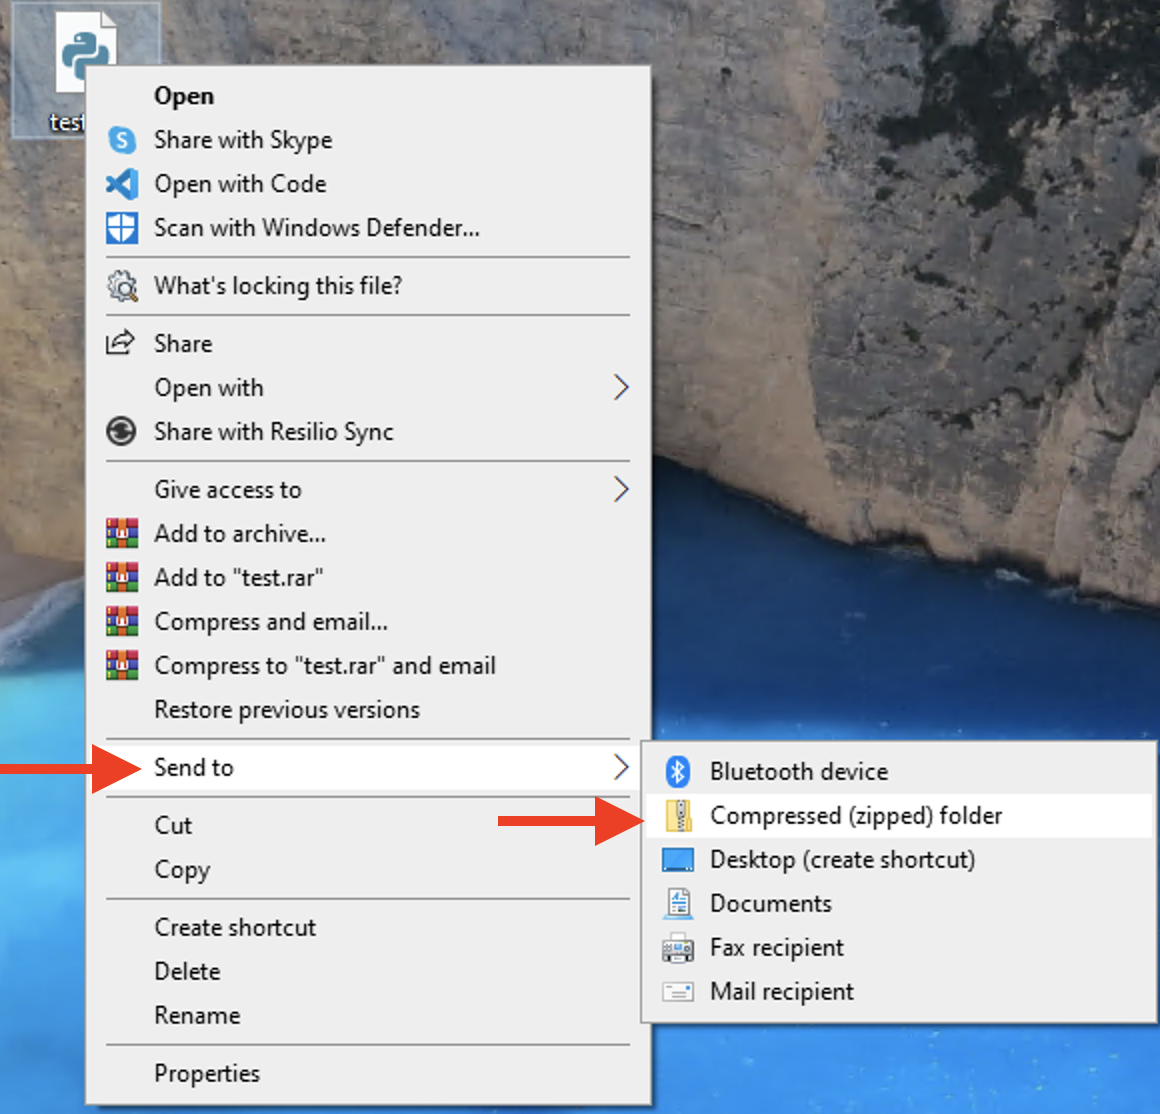
- On Windows, right-click the project folder (e.g.
Project01) and click "Compressed (zipped) folder" in the "Send to" menu.
- On macOS, right-click the project folder (e.g.
- Name your zip file your Colby username. For example, I would name mine
nsalmadi.zip. - In the Lab 1 assignment on Moodle, drag in your .ZIP folder to the submission box.
- Make sure you turn in your Google Doc lab report, .ZIP file, and rubric.
- Click "save changes" to officially submit your lab!
Get started with project
Once you are done with each of the lab tasks, you may start on the project.