Software
You will need to install three pieces of free software on your computer for this class: Zoom, Python, and a text editor. You should also configure your computer to show file extensions (e.g. .docx for Microsoft Word files). You will find step-by-step instructions below to get up and running, whether you have a Mac or Windows PC.
Zoom
You should install the Zoom app on your computer and set it up to be able to get hands-on, interactive help during lab and office hours. We will use the feature where I can control your screen remotely.
- Download Zoom to your computer and install it (you want "Zoom Client for Meetings").
- (Mac users) Follow these instructions to get your camera, your microphone, and (important) screen sharing enabled.
- These instructions assume that you know how to get to macOS System Preferences. The following screenshots show you how to get there.
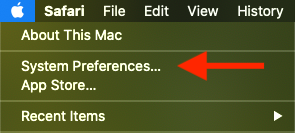
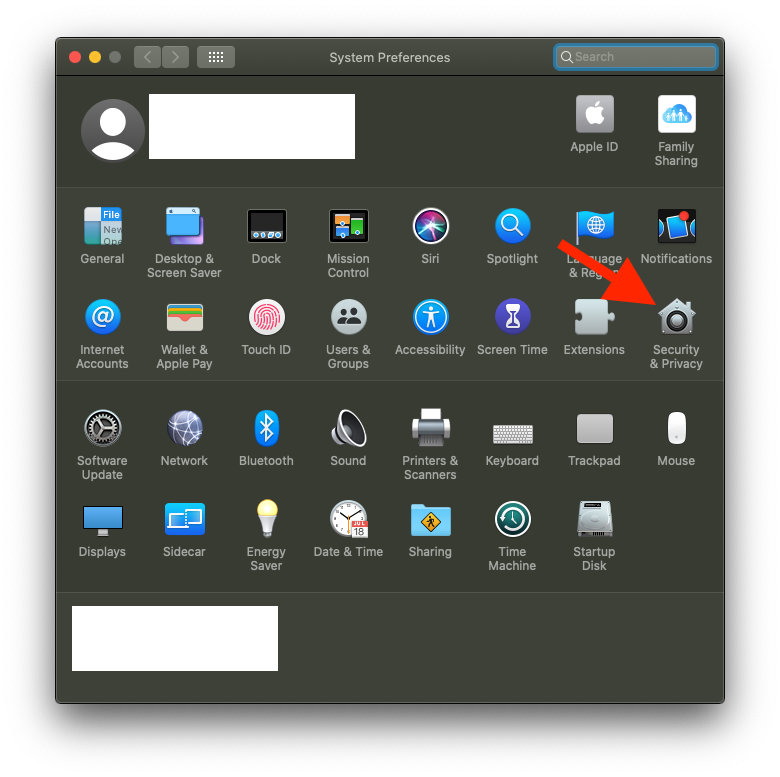
- Click on the "Privacy" tab on the top to get to where the Zoom website instructions begin.
- These instructions assume that you know how to get to macOS System Preferences. The following screenshots show you how to get there.
Python
In this class, we are using the Python 3.8 programming language. It is important that you follow these directions to make sure that everyone has the right version installed. Here are instructions for both Mac and Windows users.
Python 3.8 (macOS)
- Download Python 3.8 from python.org.
- Open the downloaded file called
python-3.8.5-macosx10.9.pkg(you might not see the.pkgpart and that's ok). The file should be in your Downloads folder. - Click the Continue buttons several times. When you reach the following screen, make sure that Macintosh HD is selected then click Continue.

- On the next screen, click Customize.
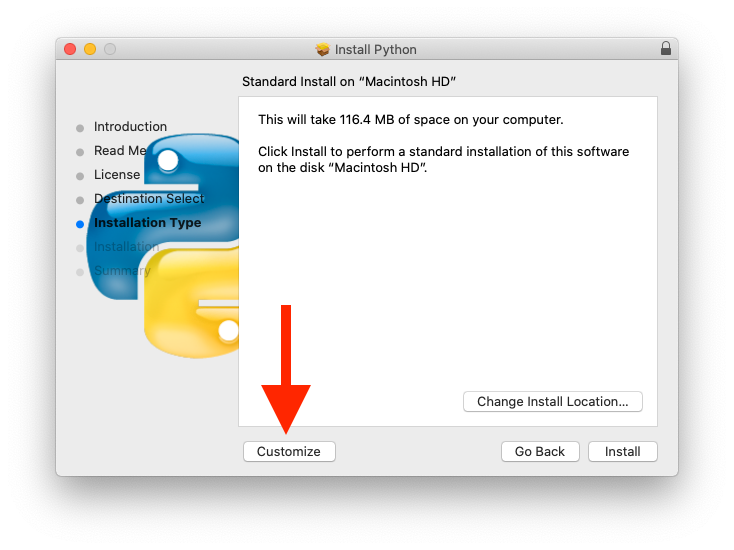
- On the next screen, deselect "GUI Applications" that the box next to it is not checked. Then click Install.

- You should now need to enter your password and Python will install (might take a minute). Afterwards, close and delete the installer.
- Now check to make sure it installed correctly. Open Terminal (you can find the app by going to the
Applications/Utilitiesfolder in Finder or by searching for it using Spotlight (press Cmd+spacebar, typeTerminal, then press Enter)). - Type
python3 --versionand hit Enter. It should returnPython 3.8.5, which means it worked!
Python 3.8 (Windows)
- Download Python 3.8 (x86-64) from python.org then and run the installer.
- Make sure the last checkbox is checked: "Add Python 3.8 to PATH"
 .
. - Click "Install Now" at the top.
- Press WinKey+R to open the Run box.
- Type
cmdand enter. - Type
py --version, then press Enter. It should printPython 3.8.5, which means it worked!
Microsoft Visual Studio Code
I recommend using the same text editor to write your code for labs and projects as I use in class, which is called Microsoft Visual Studio Code (VS Code for short). Here are instructions how to install it for Mac and Windows PC users.
VS Code (macOS)
- Download Microsoft Visual Studio Code.
- You should see a file with a blue icon called
Visual Studio Code in your Downloads folder. Drag it into your Applications folder:
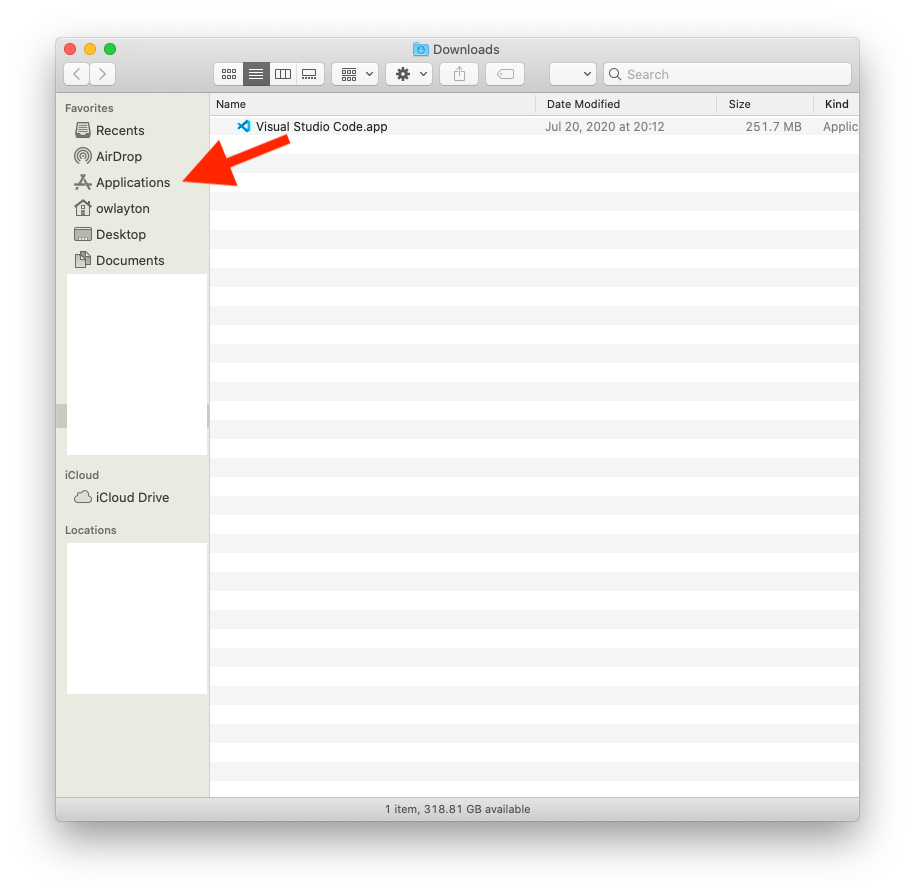
- Open VS Code and create a new file (e.g. press Cmd+N followed by Cmd+S, navigate to your Desktop, then name the new file
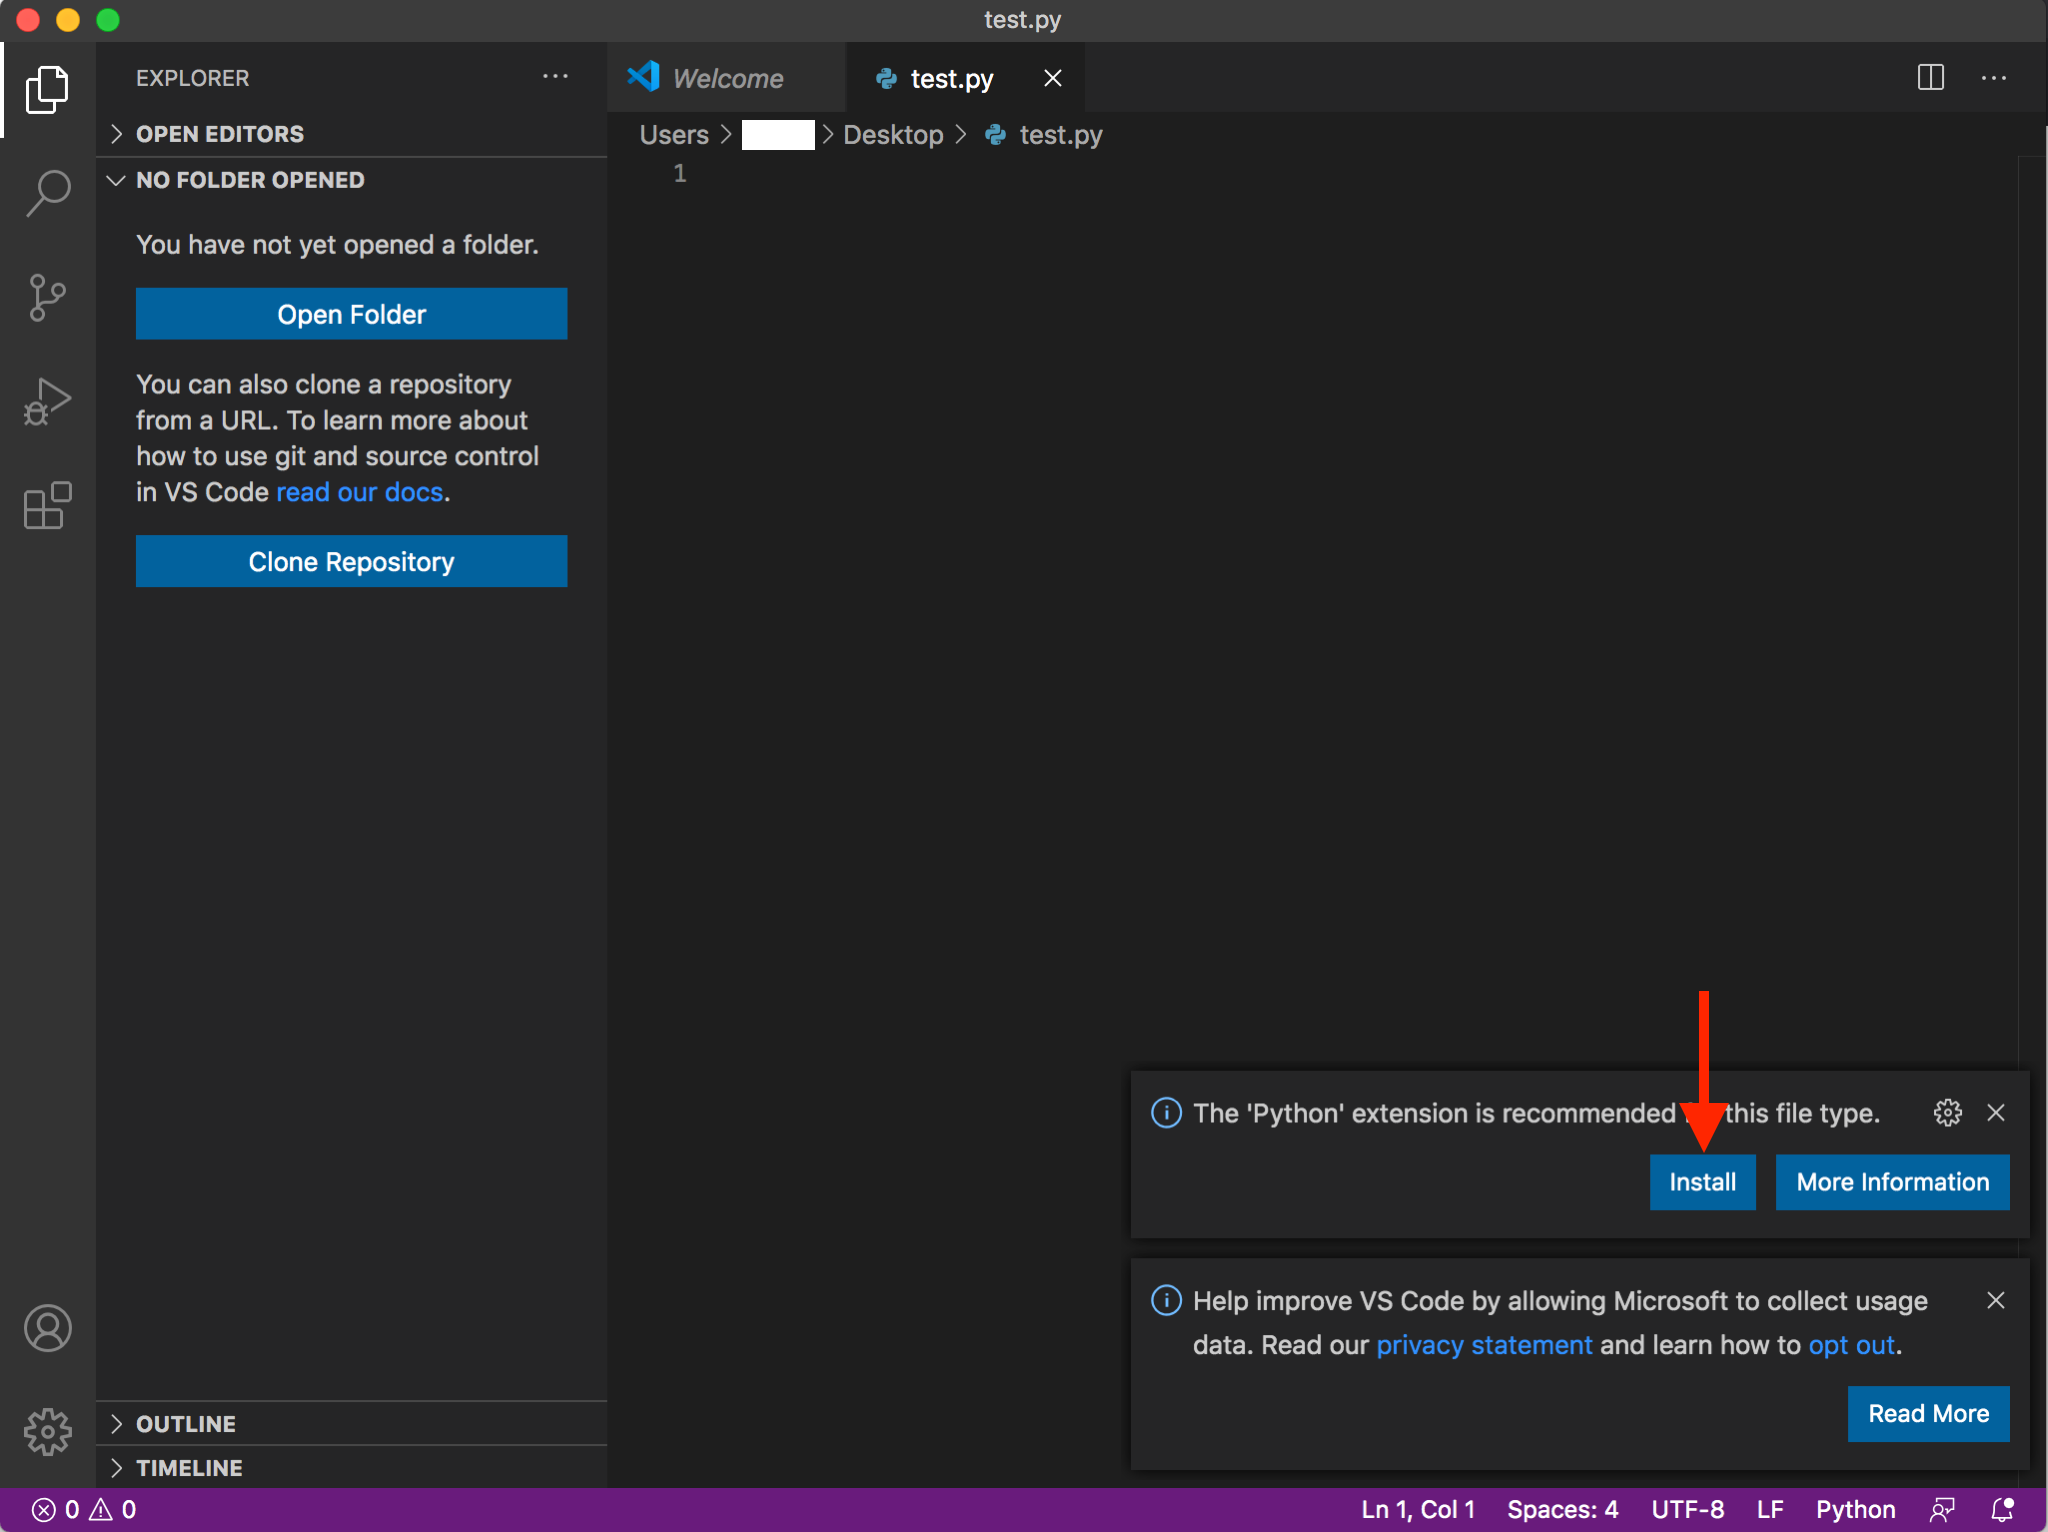
test.py). You should see a pop-up asking you about installing a Python extension. Click Install:
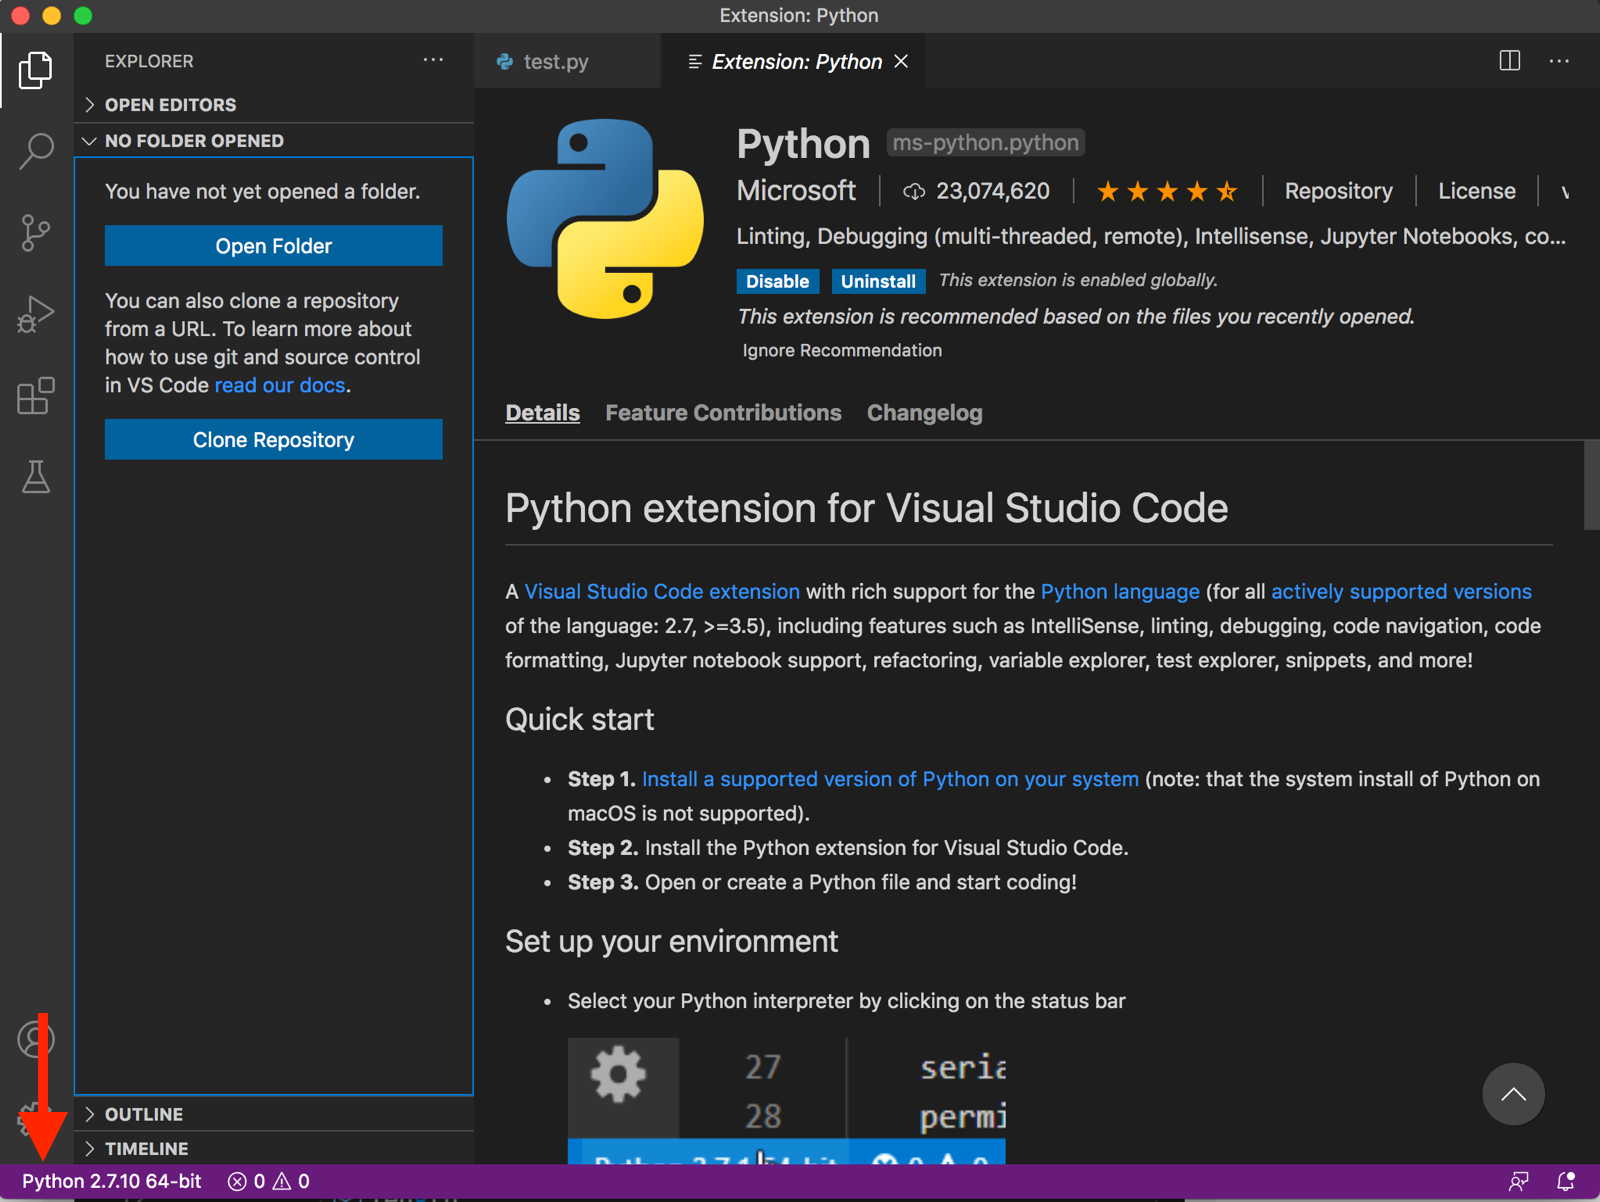
- VS Code should install it, then you should see a screen like the following. On the lower-left, click the text that says "Python", followed by some numbers:
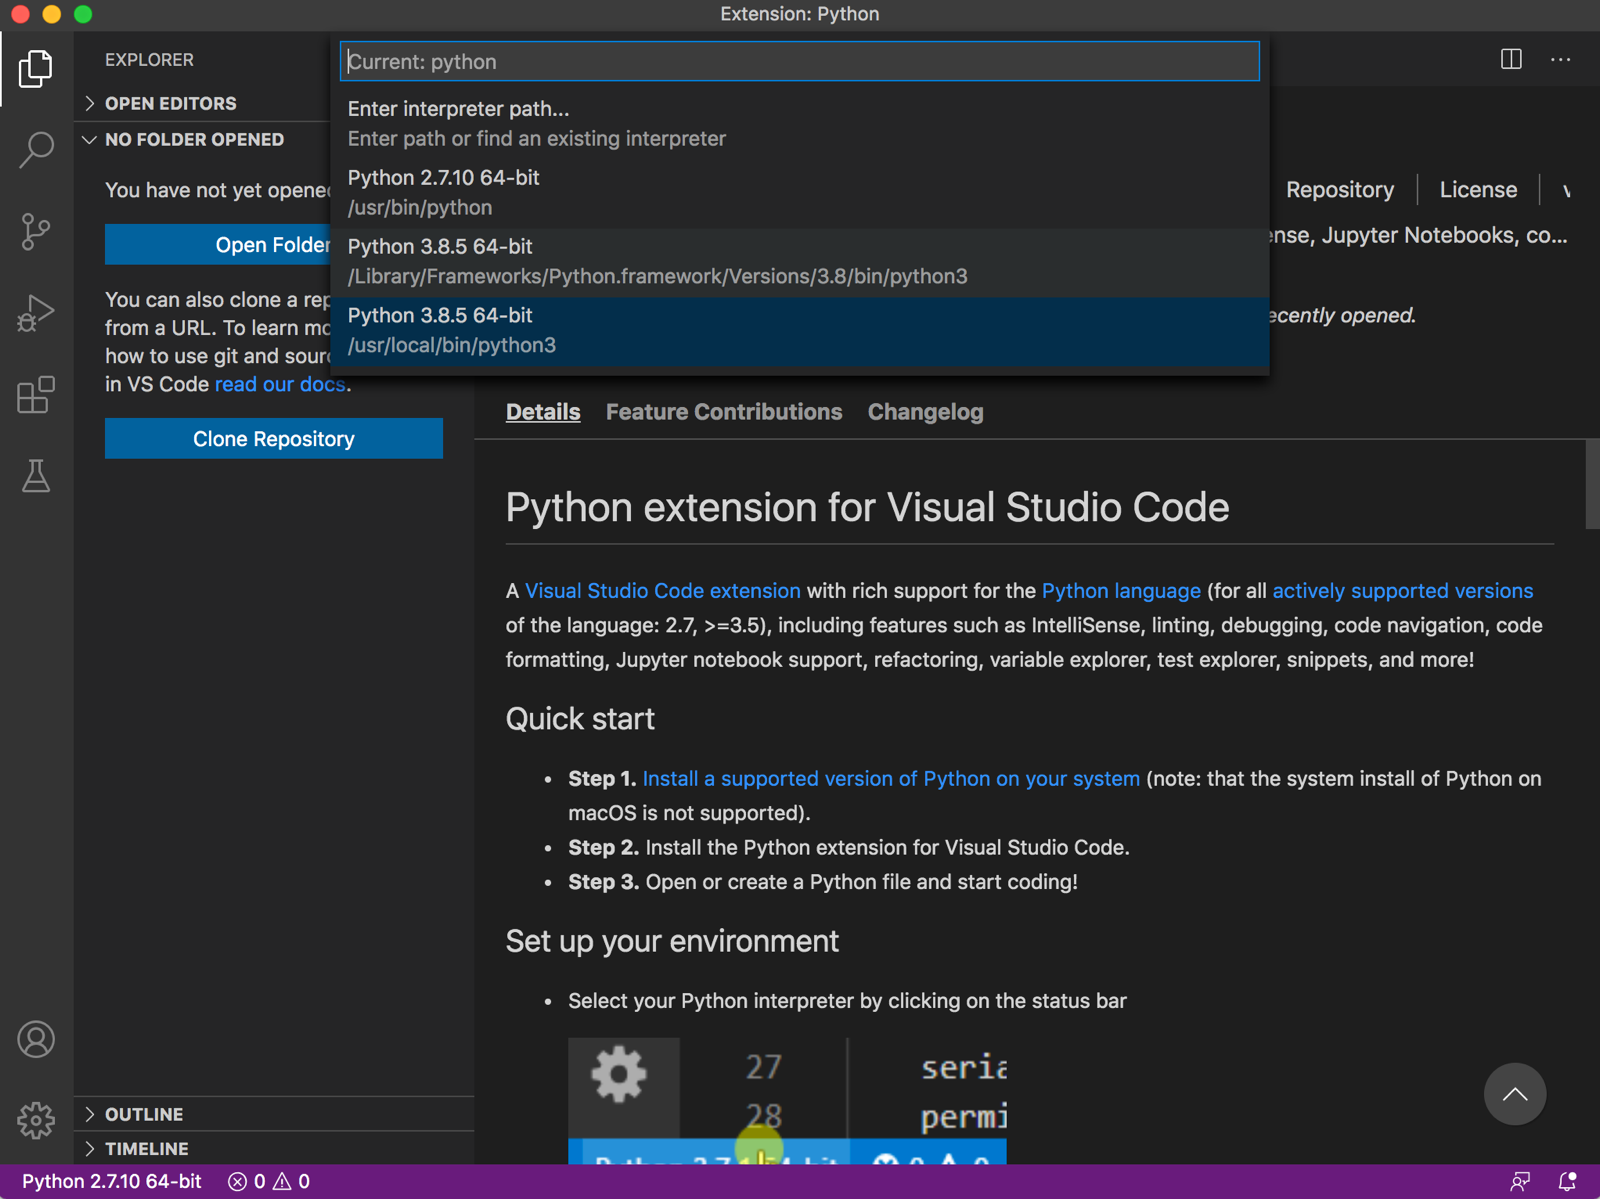
- A drop-down menu should appear with some options at the top. Click the entry that says
Python 3.8.5 64 bit followed by /usr/local/bin/python3:
- Finally, you should dismiss a pop-up window that continually appears about "Linter pylint". Click
Do not show again. You should now be all ready to write Python code in VS Code!

VS Code (Windows)
- Download Microsoft Visual Studio Code and double-click the installer file to install it on your computer.
- Now let's integrate Python with your code editor VS Code. Open VS Code and create a new file (Press Control+N followed by Control+S. Go to your Desktop. Save the file as
test.py.)
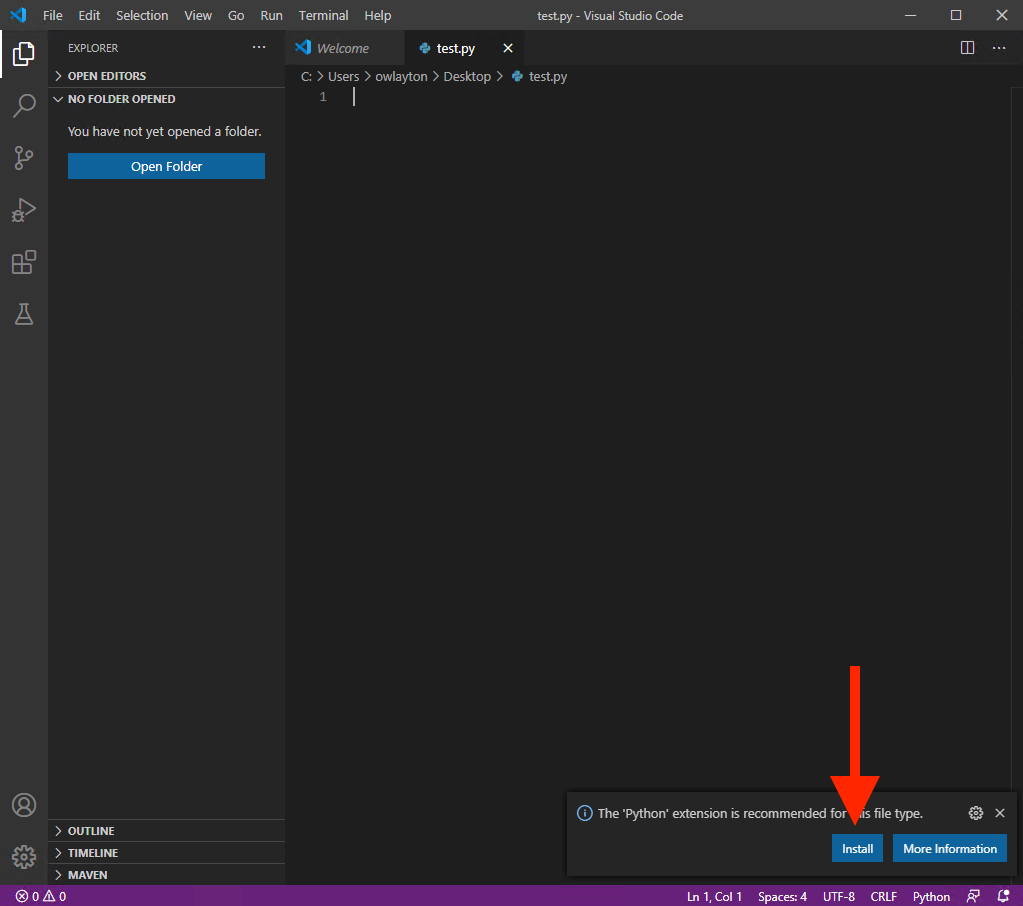
- You should now see a pop-up in VS Code about a Python extension being recommended. Click Install.
 .
.
- You should now see "Python 3.8.5" in the bottom left corner of the editor, which means you are all ready to go!
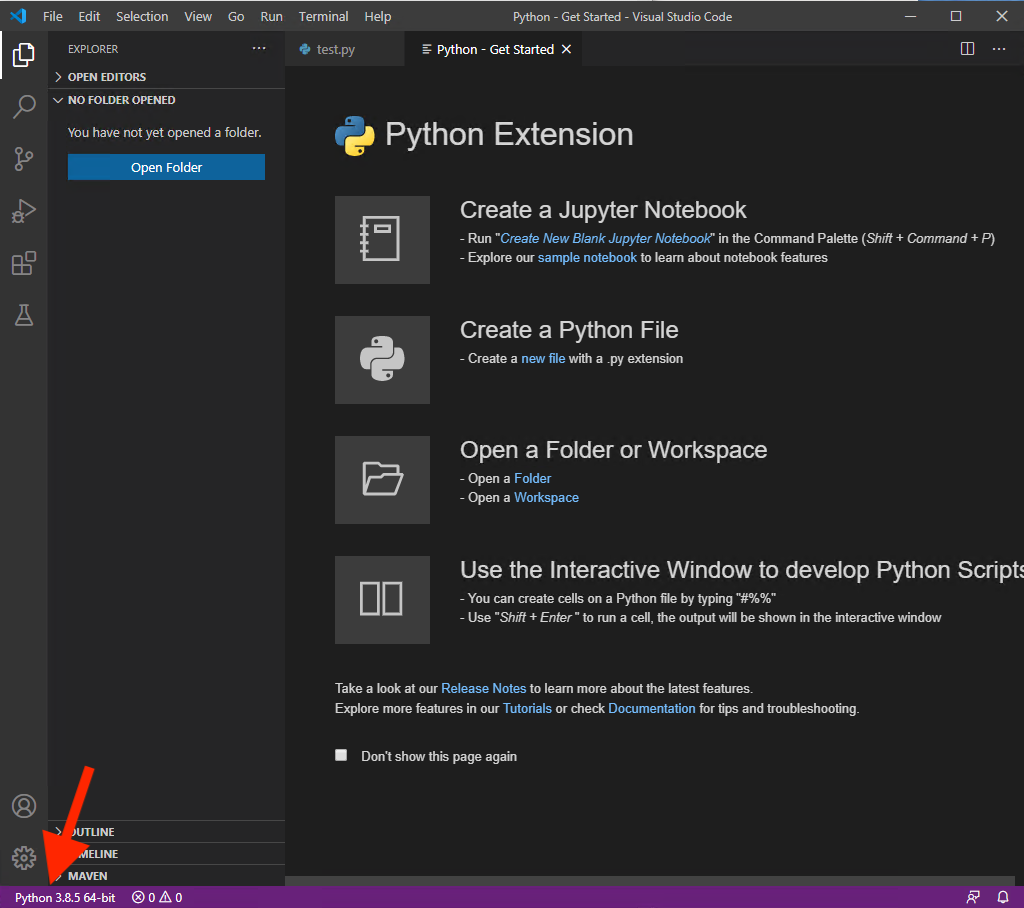 .
.
Show file extensions
To make sure that you can visually recognize code files, let's make sure that you can see file extensions (like .docx for MS Word files) on your computer.
Show file extensions (macOS)
- Go to Finder preferences by click on your desktop background, click Finder on top left corner of the screen then click "Preferences...".
- Click "Advanced".
- Make sure "Show all filename extensions" is checked.
Show file extensions (Windows)
- Open up Windows Explorer (e.g. Press Control+N after clicking on your Desktop background).
- Go to Folder Options:

- Click on the
View tab and make sure that Hide extensions for known file types is unchecked.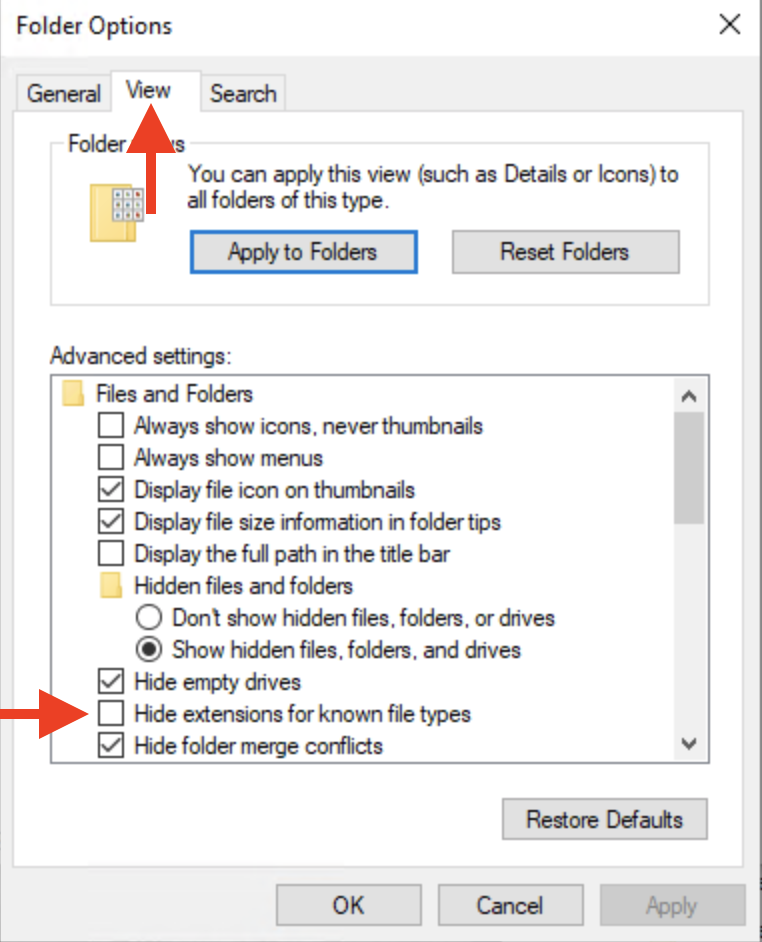
Visual Studio Code in your Downloads folder. Drag it into your Applications folder: test.py). You should see a pop-up asking you about installing a Python extension. Click Install: Python 3.8.5 64 bit followed by /usr/local/bin/python3: Do not show again. You should now be all ready to write Python code in VS Code! - Download Microsoft Visual Studio Code and double-click the installer file to install it on your computer.
- Now let's integrate Python with your code editor VS Code. Open VS Code and create a new file (Press Control+N followed by Control+S. Go to your Desktop. Save the file as
test.py.) - You should now see a pop-up in VS Code about a Python extension being recommended. Click Install.
. - You should now see "Python 3.8.5" in the bottom left corner of the editor, which means you are all ready to go!
.
Show file extensions
To make sure that you can visually recognize code files, let's make sure that you can see file extensions (like .docx for MS Word files) on your computer.Show file extensions (macOS)
- Go to Finder preferences by click on your desktop background, click Finder on top left corner of the screen then click "Preferences...".
- Click "Advanced".
- Make sure "Show all filename extensions" is checked.
Show file extensions (Windows)
- Open up Windows Explorer (e.g. Press Control+N after clicking on your Desktop background).
- Go to Folder Options:
- Click on the
Viewtab and make sure thatHide extensions for known file typesis unchecked.
© 2020 Oliver Layton