 Spring 2021
 Hunt the Wumpus
The final project uses a graph to represent a game map for the game Hunt the Wumpus, a classic RPG with very simple rules.
You are free to change the rules of the game, or even implement a completely different game, so long as the game is still built around the idea of a graph specifying the relationship between locations in the world and it makes use of Dijkstra's algorithm.
Problem Description
You are a hunter exploring a cave and hunting the Wumpus, a large, smelly monster with a keen sense of hearing that lurks in the shadows.
You do not know how the cave is laid out initially-you know only how the rooms you have visited appear. As you carefully move from room to room in the cave, you will find clues that tell how far you are from the Wumpus: if the Wumpus is two or fewer rooms away, you will smell it.
If you wander into the room with the Wumpus, it will hear you and eat you. However, you are armed with a single arrow that you can fire from one room into an adjacent room where you suspect the Wumpus is hiding. If you fire your arrow correctly, the Wumpus will be slain. If you guess incorrectly, the Wumpus, alarmed by the sound of the arrow bouncing off the cave wall, will come eat you.
You have some freedom for how you choose to implement the details of this game. This guide is intentionally vague. If you want to find out more about the original game, visit wikipedia or download a nice version of the game from here.
For this project, the minimum you are implementing is a version of the game in which the only peril in the cave is the Wumpus and the hunter has a single arrow. You should be able to re-use your LandscapeDisplay as well as your Landscape class from prior classes with some modifications.
Tasks
- Demonstrate your Graph and Dijkstra's Algorithm
As noted in the lab preview, implementing the Hunt The Wumpus game is optional. You can earn 26/30 points by completing the Vertex and Graph data structures, demonstrating they are correct, and writing a short report that shows your work. Implementing the Hunt The Wumpus game is worth up to an additional four points.
To demonstrate your Graph and shortest path algorithm are correct you must write a test program with a graph containing at least ten vertices where a path exists between any two vertices in the graph (in other words, there are no isolated nodes). The graph should be sparsely connected, with each vertex connecting to no more than three other vertices.
Run your graph at least twice with different root locations.
In your report, include some kind of spatial representation of your graph with the final costs from one of the runs of Dijkstra's algorithm shown on the edges. You can use a pen and paper and take a picture if that is easiest.
In addition, you can test your program using this GraphTester class.
- Game Setup
Copy LinkedList.java, and Landscape.java from earlier projects. You may also want your heap.
The Landscape class plays a similar role in this project as in previous projects.
The role of Landscape is not to control a simulation, however, but just to store the agents (Vertex objects, Hunter, and Wumpus) so they can be drawn (and drawn in the proper order) Update the Landscape so it has a Hunter field, a Wumpus field, and a list of Vertex type. The purpose of the Landscape class is to store them and draw them. The draw method should loop through the vertices first and draw them, then draw the Hunter and Wumpus. Remove the old updateAgents and getNeighbors methods.
- Define an InteractiveLandscapeDisplay class
Because this is an interactive game, rather than a simulation, it includes tasks that respond to keyboard and mouse signals. Download InteractiveLandscapeDisplay.java and read the code. In particular, observe the following.
- It contains an inner class MouseControl with methods that will run when there are certain mouse events. This is code that you are welcome to use, but the entire game can be constructed with out responding to mouse clicks and motion,
- It contains an inner class Control with method that will run when keys and buttons are pressed. This is the code you will want to expand.
- It has a main loop in the main function. Just like with the simulation, the code should redraw the GUI every few milliseconds. This loop is controlled by the state of the game (PLAY or PAUSE). This is the standard approach to game control -- use a state variable that is affected by the events. Please use this design. This means that events should update fields in game elements and rely on the main loop to trigger the next redraw, that will reflect those changes. For example, an up-arrow key press should change the position of the hunter, but not redraw it.
- It has testing code that requires the Vertex class exists. This means you should read the code now, but wait until you have completed the next task (the Vertex class) to run it.
- Complete the Vertex class to represent a room
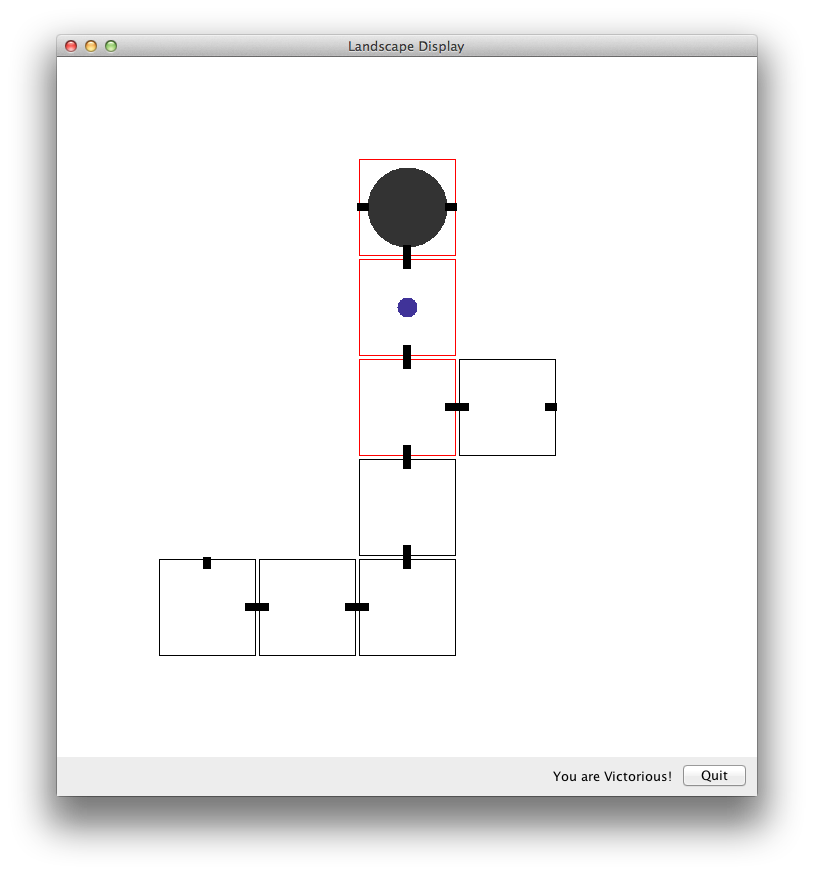
Use the vertex class to implement a room in the game. All rooms should initially be invisible except the one occupied by the hunter. When the hunter enters a room, it should become visible.
Write a
Vertex.draw()method. The visual representation should indicate two things about the room: it should show possible exits from the room and it should indicate whether the Wumpus is two rooms away or closer. Connected rooms do not need to be linked visually--if you place the rooms roughly on a grid, it will be easy to figure out where an exit leads.+ (more detail)
The following is a basic implementation that works well with a scale of 64.
    public void draw(Graphics g, int scale) {
        if (!this.visible)
            return;
        int xpos = (int)this.getX()*scale;
        int ypos = (int)this.getY()*scale;
        int border = 2;
        int half = scale / 2;
        int eighth = scale / 8;
        int sixteenth = scale / 16;

        // draw rectangle for the walls of the room
        if (this.getCost() <= 2)
            // wumpus is nearby
            g.setColor(Color.red);
        else
            // wumpus is not nearby
            g.setColor(Color.black);

        g.drawRect(xpos + border, ypos + border, scale - 2*border, scale - 2 * border);

        // draw doorways as boxes
        g.setColor(Color.black);
        if (this.getNeighbor( this.getX(), this.getY()-1 ) != null )
            g.fillRect(xpos + half - sixteenth, ypos, eighth, eighth + sixteenth);
        if (this.getNeighbor( this.getX(), this.getY()+1 ) != null )
            g.fillRect(xpos + half - sixteenth, ypos + scale - (eighth + sixteenth),
                       eighth, eighth + sixteenth);
        if (this.getNeighbor( this.getX()-1, this.getY() )
            g.fillRect(xpos, ypos + half - sixteenth, eighth + sixteenth, eighth);
        if (this.getNeighbor( this.getX()+1, this.getY() )
            g.fillRect(xpos + scale - (eighth + sixteenth), ypos + half - sixteenth,
                       eighth + sixteenth, eighth);
    }
Test it by running the InteractiveLandscapeDisplay. The version provided creates a couple of Vertex objects and connects them. You will need to modify that code to create your game.
- Define a Hunter class
Create a Hunter class. It represents the player moving around the cave. The Hunter should store a reference to its current location, which should be a Vertex object. The Hunter's position comes from the Vertex it is on. When the Hunter's current vertex changes, it should update this field. The Hunter is always visible on the map. In the Hunter's draw method, use the position associated with its current Vertex.
- Define a Wumpus class
Create a Wumpus class. It represents the Wumpus; in the default game the Wumpus does not move. The Wumpus should also have a reference to its home vertex. Unlike the Hunter, the Wumpus is visible only if it is killed by the Hunter or it eats the Hunter. Until then, it should not be drawn. Somehow, you need to pass in the visibility information to the Wumpus, including whether it should adopt a victorious pose or play dead.
- Define a HuntTheWumpus class
Create a HuntTheWumpus class. This will replace the InteractiveLandscapeDisplay class from the lab, but you can use that class as a template. This class is the main game controller class. In addition to the existing fields, it should contain at least: a Graph, a Hunter, and a Wumpus.
The constructor needs to build the graph, insert the vertices, Hunter, and Wumpus into the Landscape, and add any other user interface elements. As part of the UI setup, it should add a KeyListener and an ActionListener to the display to listen for keystrokes and clicks (if you define a quit button).
The most important function in the game is the one listening for keystrokes. A reasonable implementation is to use wasd functionality for moving around the graph (w = up, a = left, s = down, d = right). If the player hits the space bar, it should arm the Hunter's arrow. With an armed arrow, the next wasd key hit determines which direction to shoot. Hitting the space bar a second time without hitting one of wasd disarms the arrow and enables the Hunter to move again.
In the keyTyped method in the KeyListener, you can evaluate the effect of the user's actions, changing the state of the game, the position of the Hunter, the state of the Wumpus, or the position of the Wumpus, as needed. Most of the gameplay rules are executed there.
The overall game should be run from the main method of HuntTheWumpus. The main method should create a HuntTheWumpus object, enter a while loop that redraws the game board as long as the GameState is not Quit, then call the dispose method on the display object after the while loop terminates.
If you want to build Hunt The Wumpus, then read on...
The extensions are suggestions for how you could improve your game. A basic functional game is worth 3/4 points. Any reasonable extension will get you full credit.
Extensions
The following are some suggested extensions. You should feel free to pursue your own custom extensions to your project that you find interesting. Please clearly identify your extensions in your report. In your code, make sure the baseline simulations run properly. Making a separate sub-folder for major extensions is recommended.
- Have your game generate interesting random graphs so you can replay a different game every time. You probably still want to have rooms on a grid. Make sure the Hunter can get to the Wumpus. This is the most interesting extension.
- Add user interface elements like a replay button that resets the game.
- Make the game visually interesting.
- Modify the rules so the game is more challenging. Add traps, transporters, or additional levels. Think carefully about balancing the gameplay.
- Implement standard algorithms for graphs other than Dijkstra's algorithm. Show that your algorithm works properly for multiple example graphs.
- For any assignment, a good extension will be to implement a Java class that you have't implemented in the past projects and demonstrate that it has the same functionality as the Java class.
Report
Your intended audience for your report are your peers not in the class, but who have taken a CS course. Your report should explain the core CS concept used, present the results of your program, and discuss the meaning of the results: what did you discover and does it make sense?
Your project report should contain the following elements. Please include a header for each section.
- Abstract
A brief summary of the project, in your own words. This should be no more than a few sentences. Give the reader context and identify the key purpose of the assignment. Each assignment will have both a core CS purpose--usually a new data structure--and an application such as a simulation or analysis.
Writing an effective abstract is an important skill. Consider the following questions while writing it.
- Does it describe the CS concepts of the project (e.g. writing well-organized and efficient code)?
- Does it describe the specific project application?
- Does it describe the data structure you used?
- Does it describe the results of your simulation or analysis?
- Is it concise?
- Are all of the terms well-defined?
- Does it read logically and in the proper order?
- Results
Your report is intended to demonstrate that your code is working. Present your results. Include text output, images, tables, graphs, or qualitative descriptions, as appropriate. Include a discussion as to whether the results make sense and what they mean.
The first part of your results section should demonstrate that your Graph data structure and shortestPath algorithm work correctly. Include a spatial representation of the graph you used to demonstrate it is working correctly.
If you completed part or all of the Hunt The Wumpus game, the second part of your results section should show what you did. Screen shots or videos showing the gameplay along with some explanatory text is sufficient.
- Extensions
Describe any extensions you undertook, including text output, graphs, tables, or images demonstrating those extensions. If you added any modules, functions, or other design components, note their structure and the algorithms you used.
- References/Acknowledgements
A list of people you worked with, including TAs and instructors. Include in that list anyone whose code you may have seen, such as those of friends who have taken the course in a previous semester.
Handin
Here's a checklist of everything you should do when you are finished with a project and are ready to turn it in.
+ Create a report and export to pdf
- Create a report in your favorite document application (Microsoft Word, Google Doc, Libre Writer). Make sure to have all the sections described above.
- Print to PDF (Windows)
- Open a file in a Windows application.
- Choose "File > Print".
- Choose "Adobe PDF" as the printer in the Print dialog box.
- Click Print. Type a name for your file, and click Save.
- Print to PDF (Mac OS)
- Open a file in a Mac OS application.
- Click the "PDF" button and choose "Save As Adobe PDF".
- Choose the "Adobe PDF Settings" and click "Continue".
- Type a name for your file, and click "Save".
- Export to PDF Google Drive
- Choose "File" > "Download" > "PDF Document (.pdf)"
+ Organize your project folder
- In Finder, move your lab folder inside your project folder. For example, if you have
Lab09andproject_09folders both on your Desktop, drag theLab09folder insideproject_09.
+ Submit your project on Google Drive
- On Google Drive, locate the folder named with your Colby username that was shared with you earlier.
- Upload the relevant files into the matching project folder. you can ‘drag and drop’ the files into the project folder on Drive. (".class" files are not relevant)
- Note that once the files are copied, Google drive records submission time and any changes made. No further changes are allowed unless you want to make another submission.
- Submission checklist:
1- Your report should be in PDF.
2- Add your lab folder should be in your project Folder.
3- Your project and lab files are in the relevant directory in your working directory. Your working directory is the Google Drive folder with your name that I shared with you earlier.
4- The rubric is in your project directory and your name is added to the top row.