Project 04 |
Goals
- Design and implement an accelerometer/compass controller for a Unity Application.
- Control the x, y, z position and rotation.
- Navigate a space in Unity using the controller.
|
Create Unity World |
Install Unity
On your personal laptop install Unity.
Create a new 3D unity project scene
- Create a plane
- Game Object Menu -> 3D Object -> Plane
- In the object inspector tab set the scale in the x and z direction to 100.
- Create a sphere
- Game Object Menu -> 3D Object -> Sphere
- In the object inspector tab set the sphere scale in the x, y and z direction to 10.
- In the object inspector tab set the sphere position to (0,7,50).
Create a new C# script
- Create a new script
- Unity Manual: Creating and Using Scripts
- In the project tab click on the Assets folder
- Assets Menu -> Create -> C# Script
- Name your new script "cameraBehavior"
- Double click on your "cameraBehavior" script
- Before the start method create a public float field named rotationDegree and set it equal to 0.1f.
- Attach cameraBehavior script to Main Camera
- Click on Main Camera in Hierarchy tab
- Click on Add Component -> Scripts -> Camera Behavior
- A new Camera Behavior Component should appear in the inspector tab with the ability to set the rotationDegree field.
- Rotate Camera left and right using left and right arrow keys
Update script
- Add rotation around x, y and z axis
- Rotate "rotationDegree" around the x axis up when the up arrow is pressed and down when the down arrow is pressed.
- Rotate "rotationDegree" around the z axis clockwise when the key "z" is pressed and counter clockwise when the key "q" is pressed.
- Save your script.
- Click the play button and use the keys to test your program.
- Add movement up, down, left, right, forward and back
- Before the start method create a public float field named speed and set it equal to 5.0f.
- Update the object's position forward when pressing 'w', backward when pressing 'x', up when pressing 'e', down when pressing 'c', left when pressing 'a', and right when pressing 'd'.
- Make sure to convert your vector from local space to world space using TransformDirection
- Save your script.
- Click the play button and use the keys to test your program.
|
Gesture Controller |
Setup
Start with your code from Lab 4.
Save it as a new Arduino project titled colbyUsername_P04 (with your colby username, mine would be hewolfe_P04).
Gesture Controller Design
Design an accelerometer based interface to navigate a 3D space.
Interface requirements:
- Control X, Y and Z position of camera in object space
- Control roll, pitch and yaw rotation of camera
- Turn controller "on" and "off"
You may choose to filter or smooth your data using methods from the previous projects.
Carry-over from Lab
Loop Function
- Use Linear Interpolation to smoothly transition from your accelerometer readings to camera movement.
- Convert values from movement to key presses.
Linear Interpolation
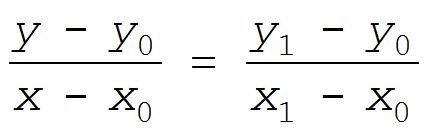
Write a method that will take a value from one range and map it to a new value inside another range. The idea here is that we want to map the input value, x, which is within the range x0 to x1, to a new range y0 to y1.
y the new value (output)y0 the new minimum value y1 the new maximum value x the input value x0 the original minimum value x1 the original maximum value
Documentation and Analysis
- User Interface Documentation
- Using a diagram, explain how your interface works.
- In a short paragraph explain how your interface works and why you made the design decisions that you did.
- Analysis
- How easy is it to use the interface?
- How accurate is it?
- Were there any modifications you made to it increase the accuracy/usability?
|
Extension |
Minor Extensions
Minor extensions build on the pre-existing circuit for this project.
Here are a few examples:
- Add additional functionality/controls.
- Create a more complex scene and control aspects of it with the accelerometer.
- Implement, test and compare other types of interpolation (SLERP etc).
- Connect to a device that is not a phone or computer and create an interface for it. Include atleast 3 commands and explain your user interface design.
Document your minor extension:
- Submit your code on filer in a folder inside your project folder.
- A 1-3 minute video documenting your extension working. (If different from project)
- A description of the extension.
- A section on implementation.
- A section on results & reflection.
- Include any relevant charts or graphs.
Major Extension
Design and implement an idea for a new project which involves adding new components and modifying the circuitry.
- It must incorporate the materials from this project; the bluetooth and accelerometer breakout boards.
- It must include atleast one of the following components: microphone, a piezo element, the IR emitters, IR receivers, and/or the vibrating motors.
- It can include potentiometers, buttons and/or red LEDs.
Document your major extension:
- Submit your code on filer in a folder inside your project folder.
- A 1-3 minute video of the system working.
- A description of the extension.
- A circuit diagram.
- A photograph of the circuit board.
- A section on implementation.
- A section on results & reflection.
|
Submission |
Export Unity Code as Package
- Assets Menu -> Export Package
- Make sure all the boxes are ticked
- Click "Export"
- Name your package colbyUserID_p4
- Copy you package to filer in your project folder
Submit your code on Filer
Submit your arduino code in a folder titled colbyUsername_P04 (with your colby username, mine would be hewolfe_P04).
Submit your report and video on Google Classroom
Upload a 1-3 min Documentation Video of your gesture controller working. Show the ability to move forward, back, left, right, up and down. Show the ability to rotate left, right, up, down, clockwise and counter clockwise. State your intention before completing the task. Explain your interface as you are using it.
Attach a Google Doc Report which includes:
- Photo of circuit. Clear photo of the circuit in which the wiring is clearly visible.
- Implementation Section
- Explain how you implemented the project.
- Explain what algorithms or techniques you used.
- Draw a diagram and explain how you designed your interface.
- Results & Reflection Section
- How well does your implementation work?
- What were the results of your analysis?
- Acknowledgements Section
- What resources did you use? Include websites, books and anyone you received help from or discussed the project with.
|